Working with ADFS/SAML
•Sample Data Flow in ADFS/SAML Authentication
•Setting Up ADFS Authentication in Ivanti Neurons for ITSM
•Setting Up Authentication for ADFS/SAML
•About Provisioning Attributes
•Exporting Ivanti Neurons for ITSM Relying Party Metadata
•Adding an Authentication Provider by Importing Metadata
Sample Data Flow in ADFS/SAML Authentication
Sample Data Flow
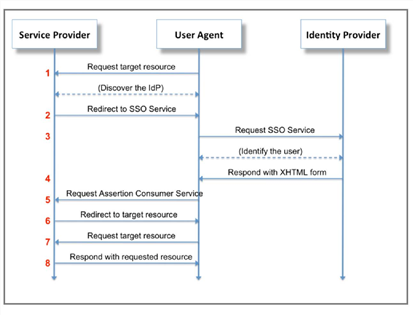
1.The user browses to their URL, such as tenant.saasit.com, enters their user name, and clicks login. The user does not enter a password.
2.Neurons for ITSM sends a redirect to the browser pointing to the identity provider (ADFS) based on the information configured in the SAML authentication provider record.
3.The user lands on their ADFS endpoint for logging in. This is a different page than is hosted on the side of the customer.
4.On successful authentication through ADFS, ADFS renders a page to the user that does nothing but post the SAML assertion to Neurons for ITSM's SAML.
5.The browser posts the SAML response back to the Neurons for ITSM endpoint with the SAML assertion, and a session for the user is created.
6.Neurons for ITSM sends a redirect to the browser of the user pointing them at the home page of the application (as if they had logged in as usual).
7.The browser of the user asks for the resource.
Setting Up ADFS Authentication in Ivanti Neurons for ITSM
The Neurons for ITSM online help does not explain how to install and configure the ADFS server. See Active Directory Federation Services for information about installing and configuring ADFS. We have included some general guidelines here but not complete information.
Before you begin, ensure the following:
•You have installed ADFS Release 2.0 or later.
•You have valid certificates for the Neurons for ITSM application server and for the ADFS server.
•The websites for both servers use SSL site binding (HTTPS, 443).
Follow the steps in these sections to set up authentication:
2.Step 1: Exporting the ADFS Server Certificate with Public Key
3.Step 3: Setting Up the SAML Server
4.Step 4: Getting the Certificate
5.Step 5: Configuring the Ivanti Neurons for ITSM Site Certificate
6.Step 6: Supplying the Ivanti Neurons for ITSM Certificate File
Step 1: Exporting the ADFS Server Certificate with Public Key
1.From the ADFS server, open the Microsoft IIS Manager.
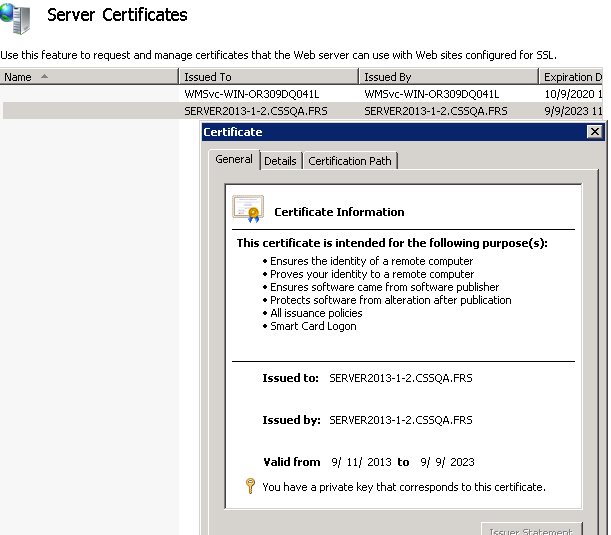
2.Double-click to open Server Certificates in features view. Click the certificate that is assigned to Microsoft IIS. Ensure this certificate has a private key.
Server Certificates

3.Click the Details tab, then click Copy to File.
4.Click Next.
5.Select No, do not export the private key, then click Next.
6.Select DER encoded binary X.509, then click Next.
7.Enter the file name with the full path, then click Next.
8.Click Finish.
9.Copy this certificate and paste it into the Neurons for ITSM application server, which sets up the authentication provider.
Step 2: Uploading the Certificate to the Ivanti Neurons for ITSM Application Server
Upload the Neurons for ITSM application server certificate for the Ivanti SM tenant. The certificate should include the private key; usually the file extension is .pfx. You download this certificate later for setting the ADFS signature.
1.Log into the Neurons for ITSM configuration database and open the Tenants workspace. The application displays a list of tenants. See the Configuration Database Guide for Ivanti Neurons for ITSM for information about using the ConfigDB.
2.Open the tenant to add a certificate to.
3.Click Add Certificate.
Add Certificate
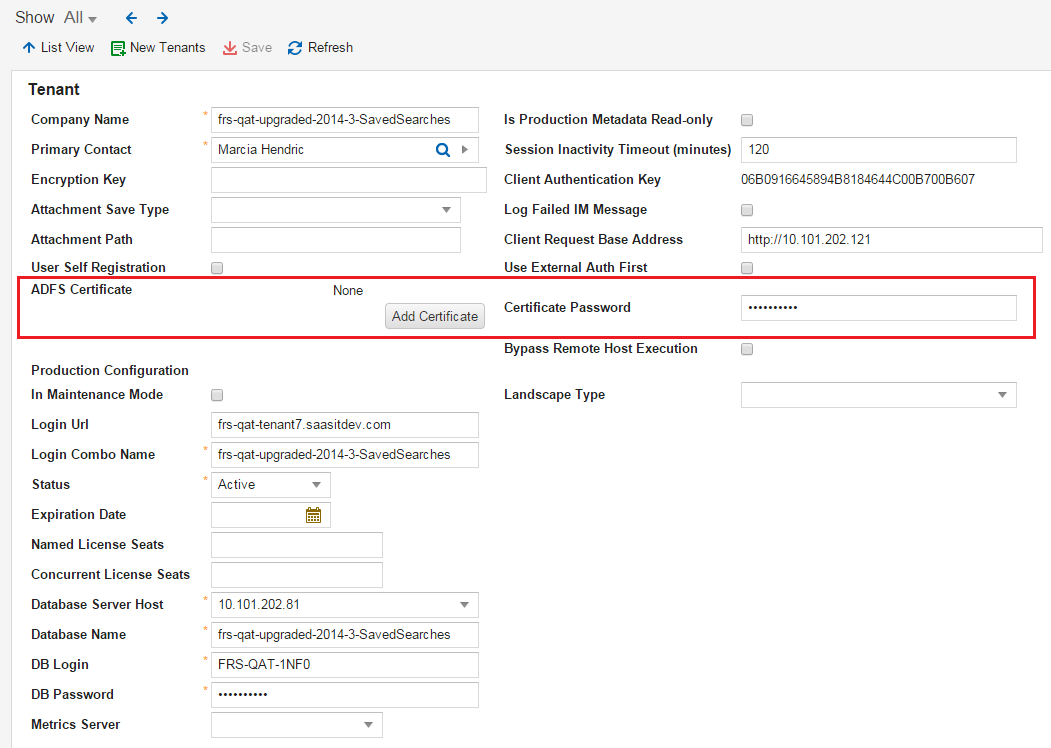
4.Navigate to the certificate location. This certificate is the same one that was used to set up SSL in Microsoft IIS.
5.Highlight the certificate and click Open.
6.Enter the password for the certificate in the Certificate Password field.
7.Click Save.
8.Check to ensure that the certificate has a private key in the Actions pane in Microsoft IIS.
Check the Certificate Private Key
Step 3: Setting Up the SAML Server
The process for setting up ADFS to work with Neurons for ITSM is as follows:
1.Step A: Installing the ADFS Server
2.Step B: Ensuring that the ADFS Form is on Microsoft IIS Authentication Types
3.Step C: Setting Forms-Based Authentication Mode for ADFS
4.Step D: Adding a New Relying Party to the ADFS Manager
7.Step G: Setting the Properties of the Relying Party
Step A: Installing the ADFS Server
The Neurons for ITSM online help does not explain how to install and configure the ADFS server. See https://msdn.microsoft.com/en-us/library/bb897402.aspx for information about installing and configuring ADFS. We have included some general guidelines here but not complete information.
Install the ADFS server on the tenant. Ensure that you do the following:
•Install ADFS Release 2.0 or later. For ADFS Release 2.0, you install it from a downloadable package. For ADFS Release 3.0, you install it by using the Add Roles Wizard from the server manager.
•Install ADFS as a federation server.
Step B: Ensuring that the ADFS Form is on Microsoft IIS Authentication Types
This step is only for ADFS Release 2.0 and is not needed for ADFS Release 3.0.
Ensure that the ADFS form is located in your Microsoft IIS Manager. Choose Start > Control Panel > AdministrativeTools > ADFS 2.0 Management Wizard.
Step C: Setting Forms-Based Authentication Mode for ADFS
Forms-based authentication means that a forms-based .aspx page is presented to the user containing the user name and password fields. You can customize this page to add new sign-in logic or page customizations (such as logos, style sheets, and so on).
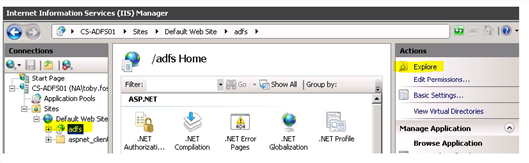
1.Open Microsoft IIS Manager, select the adfs virtual directory, and click Explore.
Microsoft IIS Manager Window
2.From the \adfs\ls folder, select web.config, then select Edit in Notepad.
3.Find <localAuthenticationTypes>.
There are four lines below <localAuthenticationTypes>. Each line represents one of the local authentication types.
4.Cut the entire Forms line and paste it to the top of the list under <localAuthenticationTypes>:
<localAuthenticationTypes>
<add name="Forms" page="FormsSignIn.aspx" />
<add name="Integrated" page="auth/integrated/" />
<add name="TlsClient" page="auth/sslclient/" />
<add name="Basic" page="auth/basic/" />
</localAuthenticationTypes>
5.Save and close the web.config file.
Step D: Adding a New Relying Party to the ADFS Manager
You can do this in one of two ways: either by manually entering data or by importing data from a file.
•Adding Relying Party Data Manually
Adding Relying Party Data Manually
Register Neurons for ITSM as a relying party at ADFS by creating a relying party trust under the Trust Relationships node.
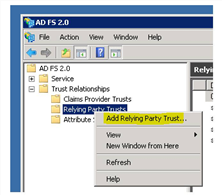
1.Select Trust Relationships, right-click Relying Party Trusts, then select Add Relying Party Trust....
Add Relying Party Trust
2.Click Start to begin the wizard.
3.Select Enter data about the relying party manually.
Enter Data about the Relying Party Manually

4.Click Next to set the display name.
5.Enter a display name, such as Ivanti SM ADFS.
6.Click Next to choose your profile.
7.Click Next to configure the certificate.
Configuring the certificate is an optional step. Only the login name is transferred to Neurons for ITSM for authentication, which is also not normally required to be encrypted. However, you can encrypt it by adding the Ivanti SaaS.cer certificate file.
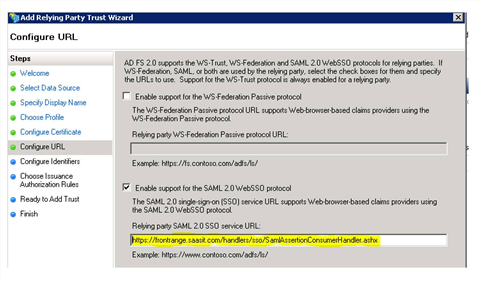
8.Click Next to configure the URL.
9.On the Configure URL page, do the following:
•Check Enable support for the SAML 2.0 WebSSO protocol.
•In the Relying party SAML 2.0 SSO service URL field, enter the Neurons for ITSM SAML Release 2.0 endpoint, which is https://tenant/handlers/sso/SamlAssertionConsumerHandler.ashx.
Enter the Tenant URL
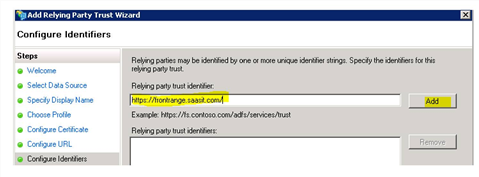
10.Click Next to configure the identifiers. In the Relying party trust identifier field, enter tenant.saasit.com/ and click Add. Be sure to enter the forward slash at the end.
Enter the Identifier in the Relying Party Trust Identifier Field
11.In the Relying party trust identifiers text box, you can add multiple URLs, as shown:
Add Multiple URLs
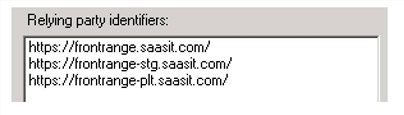
You can add additional URLs after you complete the wizard by selecting Properties and then clicking the Identifiers tab.
12.Click Next to choose the issuance authorization rules..
13.Select Permit all users to access this relying party.
14.Verify your settings and click Ok. The application displays a new entry under Relying Party Trusts in the ADFS Manager.
Importing Relying Party Data
You can import the data about the relying party from a file. Before you begin, get the XML file from the Neurons for ITSM metadata endpoint.
1.Select Trust Relationships, right-click Relying Party Trusts, then select Add Relying Party Trust....
2.Click Start to begin the wizard.
3.Select Import data about the relying party from a file.
4.Upload the XML file and click Continue.
5.Select a display name, such as saas-dev.
6.Select Permit all users to access this relying party.
7.To not support encryption, ensure that you remove the certificate from the Encryption tab.
Step E: Adding a Claim Rule
1.Right-click the new entry that you just created in the ADFS Manager.
2.Select Edit Claim Rules.
Edit Claim Rules

3.Click Add Rule.
4.In the Claim rule template field, select Send LDAP Attributes as Claims.
Send LDAP Attributes as Claims

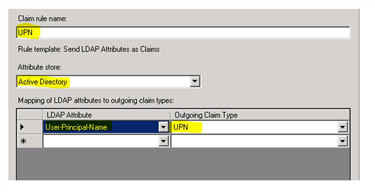
5.In the Claim rule name field, set a rule name, for example, UPN.
6.For attribute store, select Active Directory.
7.In the Mapping of LDAP attributes to outgoing claim types section,
•For LDAP Attribute, select User-Principal-Name.
•For Outgoing Claim Type, select UPN.
Mapping of LDAP Attributes to Outgoing Claim Types
8.Click Ok.
9.Add a second rule to map UPN and NAMEID.
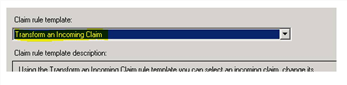
•Click Add Rule.
•In the Claim rule template field, select Transform an Incoming Claim.
Map UPN and NAMEID
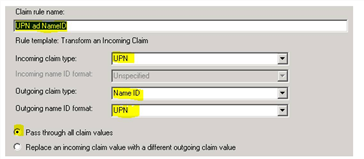
•In the Claim rule name field, set a rule name, for example, "UPN and NameID".
•Incoming claim type: Select UPN.
•Outgoing claim type: Select NameID.
•Outgoing name ID format: Select UPN.
•Select Pass through all claim values.
To enable the auto provisioning feature, the following claims should be issued: email address, first name, and last name.
Client Rule Name Window
10.Click Ok.
Step F: Getting the Certificate
This is the certificate that you got in Neurons for ITSM, as described in Step 6: Supplying the Ivanti Neurons for ITSM Certificate File.
1.In the ADFS Manager, double-click Service, then open Certificates.
2.Select the token-signing certificate for your site. This can be a valid public certificate or a private self-signed certificate.
3.Click Copy to file. Leave No, do not export private key as the default. Do not select Yes, export private key. You should not be asked for a password during copying.
4.Select DER coded binary X.509 (.CER).
5.Navigate to a folder to save to. If you are remotely connected to another computer, copy the file locally.
6.Click Finish.
7.Double-click and open the certificate, click the Details tab, and note the serial number of the certificate. You will need this number later.
Step G: Setting the Properties of the Relying Party
Before doing this procedure, ensure that you have the Neurons for ITSM certificate file.
1.Double-click the newly created relying party, or right-click and select Properties.
2.Click the Signature tab.
3.Click Add.
4.Select and open the saas.cer file that you just downloaded.
5.Ensure that you have the correct certificate, otherwise this does not work and it is difficult to troubleshoot. To verify that you have the correct certificate, do the following:
| a. | Select View. |
| b. | Click the Details tab. |
| c. | View the certificate serial number: 21 a6 74 1f 94 cc 59 b0 8c d4 33 aa d7 01 e1 4e. |
This certificate has the public key used to encrypt the message to Neurons for ITSM for which the user is permitted.
6.(Optional) If your ADFS application is not configured specifically to support SHA-256 digital signatures, which by default it is not, do the following:
| a. | Double-click the newly created relying party, or right-click and select Properties. |
| b. | Click the Advanced tab. |
| c. | For secure hash algorithm, select SHA-1. |
| d. | Click Apply. |
7.Add the logout feature:
| a. | In the Properties window, click the Endpoints tab. |
| b. | Click Add. |
Endpoint Properties

| c. | For endpoint type, select SAML Logout. |
| d. | For binding, select POST. |
| e. | For the URL, enter https://tenant/handlers/sso/SamlLogoutHandler.ashx?message=LogoutRequest. |
| f. | For the ResponseURL field, enter https://tenant/handlers/sso/SamlLogoutHandler.ashx?message=LogoutResponse. |
| g. | Click Ok. |
| h. | Repeat to add a separate entry for each URL. |
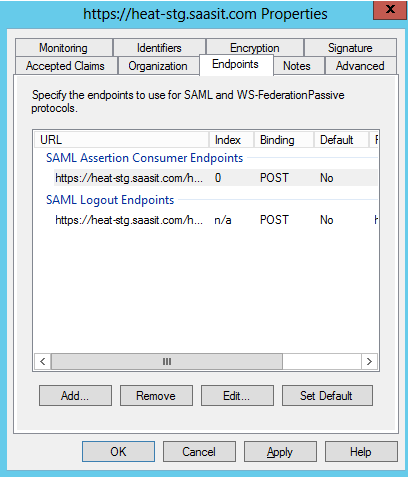
For example, for the heatsoftware.saasit.com, heatsoftware-stg.saasit.com, and heatsoftware-plt.saasit.com URLs, your endpoints configurations should look as follows:
Sample Endpoint Configurations
8.Click Ok.
Step 4: Getting the Certificate
1.Click the Sign On tab.
Sign On Tab
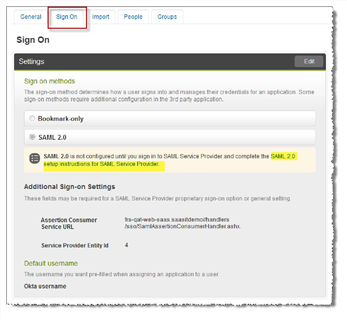
2.Click SAML 2.0 setup instructions for SAML Service Provider to view the instructions.
3.Click CLICKING HERE to download the certificate from the identity provider.
Download the Certificate
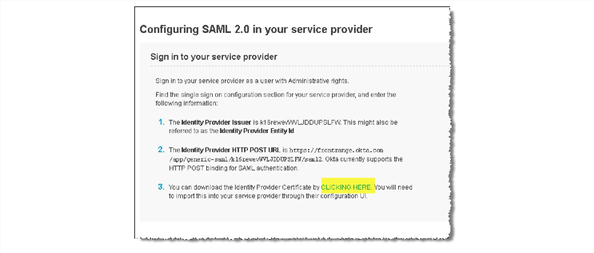
4.Download and save your certificate.
5.Rename the file extension to .cer.
6.In the Configuration Console, go to Settings > System > Attachment Extensions and ensure that .cer is a valid file extension. If not, add it to the application. See Working with Attachment Types.
Step 5: Configuring the Ivanti Neurons for ITSM Site Certificate
ADFS authentication requires configuring a public-private key pair on the tenant. Ensure that ADFS Release 2.0 or later is installed on the ADFS server.
•Obtaining a Certificate File with a Private Key (.pfx file).
•Installing the Certificate on the Tenant
Obtaining a Certificate File with a Private Key (.pfx file).
1.On the ADFS server, where ADFS is installed, from the Start menu, click Run and enter mmc.exe, which is the name of the executable file.
2.From the File menu, select Add/Remove Snap-ins.
3.Select Certificates and click Add.
4.Select the default My user account option to add the certificates snap-in for the current user, and then click Finish.
5.Select the created certificate from personal certificates, click All Tasks > Export.
6.Select Yes, Export private key and enter your password.
You can also create a new .cer file, without a private key, to use on the ADFS computer, if your original file contains a private key.
7.On the tenant computer, define the HTTPS binding for Microsoft IIS and add the .pfx file IIS > Default Web Site>Edit Binding>Configure HTTPS.
Installing the Certificate on the Tenant
Before you begin, ensure that the application allows .pfx attachments to be uploaded. See Working with Attachment Types.
1.Log in to the Neurons for ITSM configuration database (ConfigDB) and open the Tenants workspace. The application displays a list of available tenants. See the Configuration Database Guide for Ivanti Neurons for ITSM for information about using the ConfigDB.
2.Open the Tenant workspace for that tenant.
3.Click Add Certificate to add the ADFS private certificate for this tenant.
4.Browse to the certificate, highlight it, and click Open.
5.Enter the password for the certificate.
Step 6: Supplying the Ivanti Neurons for ITSM Certificate File
Before getting the certificate, ensure that you have configured your ADFS/SAML server.
Give the Neurons for ITSM certificate to the ADFS administrator. You can use the public key on the ADFS computer if your original one contains the private key. Prior to supplying the Neurons for ITSM certificate, ensure that you have followed the procedure described in Step 5: Configuring the Ivanti Neurons for ITSM Site Certificate.
1.From the Configuration Console, in the center pane, under the System Security topic, click ADFS Certificate.
Some pop-up blockers might prevent the file from downloading. The link gives you the ability to download the Ivanti Software saasit.com.cer file. Temporarily save this file to your desktop. If for some reason the file does not download, contact Ivanti Support and they can provide the file to you.
2.Continue to configure the server.
Setting Up Authentication for ADFS/SAML
Before setting up an authentication provider, make sure that you have configured your ADFS/SAML server and downloaded the certificate. See Working with Single Sign-On Authentication.
1.From the Configuration Console, click Configure > Security Controls > Authentication Providers to open the Authentication Providers workspace.
2.From the New Record Menu drop-down list, select New ADFS/SAML.
ADFS/SAML Workspace
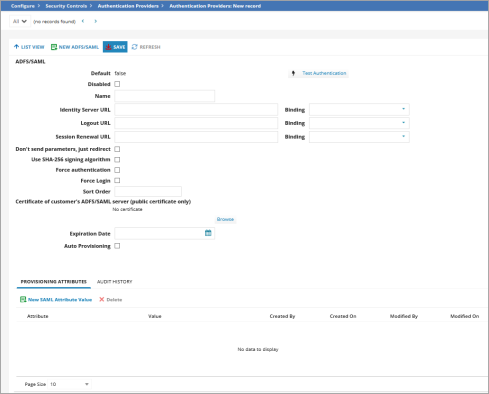
3.Enter data into the fields.
| Field | Description |
|---|---|
| Default |
Specifies if this authentication provider is called.
Automatically set by the application. You change this in the list. To make this authentication provider the default, you must first change the default setting for all other authentication providers to false and then change the default setting for this authentication provider to true. |
| Disabled | Specifies if this authentication provider is disabled. |
|
Name |
The tenant ADFS/SAML name. |
|
Identity Server URL |
The URL for the tenant ADFS or SAML. Normally, this is https://tenant/adfs/ls. |
|
Logout URL |
The URL to which users are directed when logging out of the authentication provider. This is defined on the ADFS computer as the SAML endpoint. Normally, this is https://tenant/adfs/ls. |
| Session Renewal URL | Specifies the URL to display when the session expires and the user clicks Renew. If you do not enter a value, the application uses the URL specified in the Identity Server URL field. |
| Binding |
Specifies how application requests are made against the identity provider endpoint. The binding settings for Neurons for ITSM and the identity provider should match. With ADFS, you can use the same endpoint for both HTTP POST and HTTP redirect.
For the Identity Server URL, Logout URL, and Session Renewal URL fields, select a binding from the drop-down list: HTTP Redirect: Does the binding as specified in the SAML specification. HTTP POST None - Simple Redirect: This is not a SAML binding, but a link that is treated as a simple address with no SAML request parameter attached.
The HTTP redirect and HTTP POST binding parameters are described in the SAML specification at https://wiki.oasis-open.org/security/FrontPage.
By default, the application uses HTTP redirect binding unless you check Don't send parameters, just redirect. |
| Don't send parameters, just redirect | We recommend that you do not use this parameter. Keep it unchecked. If you do check it, the application uses None - Simple Redirect for all bindings. |
|
Use SHA-256 signing algorithm |
Adds a unique signature using this algorithm only if you did not follow the procedures in (Optional) If your ADFS application is not configured specifically to support SHA-256 digital signatures, which by default it is not, do the following: of Step G: Setting the Properties of the Relying Party. |
|
Force authentication |
Forces users to re-enter their password when signing in. This option requires users to relogin each time they access the login page, even if they have a valid cookie. |
|
Force Login |
The Force Login option is applicable to users reaching concurrent session limits, in the case of external authentication.
|
|
Sort Order |
Specifies the sort order of this provider in relation to other providers assigned to a user. A value of 1 means that this provider is used first for authentication when logging in. If a login failure occurs (such as a server failure or incorrect password), the application uses the next provider in the sort order. The last successfully authenticated login is highlighted in the Enable External Auth area of the employee record. Use this field only if multiple authentication providers are configured. ADFS/SAML must be the last or only entry in the sort order. After the application redirects to the ADFS site, the application does not have a way of knowing if ADFS failed, so there is no fallback to a different authentication method. |
|
Certificate of customer's ADFS/SAML server (public certificate only) |
Click Browse to locate a secure signing certificate providing a digital signature for this provider.
This is the public part of the identity provider signing certificate. You must request this from the identity provider. This helps to validate that it came from the exact identity provider and not from a fake one.
In previous releases, Neurons for ITSM required this certificate. However, the signature verification certificate is no longer required, although it is strongly recommended. If there is no certificate, Neurons for ITSM cannot verify the identity of the identity provider; this could be a security issue.
If you do not upload a certificate here, the authentication succeeds, but the application gives the following error in the Neurons for ITSM log: "Verification certificate is not set for 'ProviderName' provider. Unable to verify request signature." |
|
Expiration Date |
Specifies the date that the certificate expires. This field merely stores the date so that you can see when the current one expires and get another certificate before or when it expires. |
|
Adds new users via authentication. You have the option to auto provision the role, status, and team for the new user. If selected, the application creates an employee record if a user logs in using authentication and does not already have an employee record. The employee record created shows the Is Auto Provisioned checkbox selected and the creation method as Auto Provisioned through SAML by default. |
|
| Auto Provision Role |
Only displays if you check Auto Provisioning.
The role associated with the new user. |
| Auto Provision Status |
Only displays if you check Auto Provisioning.
|
| Auto Provision Team |
Only displays if you check Auto Provisioning.
The team associated with the new user. |
| Auto Provision User Business Object |
Only displays if you check Auto Provisioning.
The type of user record to create. Can be either employee or external contact. |
4.Click Test Authentication to test the authentication. See About ADFS/SAML Diagnostics.
5.Specify custom attribute names for the email address, first name, and last name. See About Provisioning Attributes. Do the following:
| a. | Click the Provisioning Attributes tab. |
| b. | Click New SAML Attribute Value. The application displays the New SAML Attribute Value dialog box. |
New SAML Attribute Value
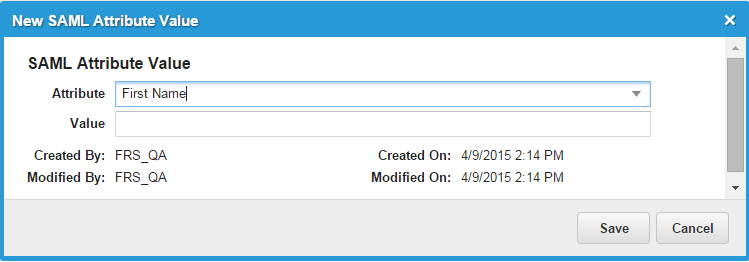
| c. | Select an attribute (email address, first name, last name, or user principal name [UPN]) from the drop-down list. (Note that once you add an attribute, you cannot edit it. To change the attribute, delete it and add a new one.) |
| d. | Enter a value for the attribute. The following are the default values. These standard SAML attribute names are defined by the SAML specification (see http://saml.xml.org/saml-specifications) and are in the form below: |
| Ivanti Neurons for ITSM User Property | SAML Attribute Name |
|---|---|
| LoginID | http://schemas.xmlsoap.org/ws/2005/05/identity/claims/upn |
| First Name | http://schemas.xmlsoap.org/ws/2005/05/identity/claims/givenname |
| Last Name | http://schemas.xmlsoap.org/ws/2005/05/identity/claims/surname |
| Primary Email | http://schemas.xmlsoap.org/ws/2005/05/identity/claims/emailaddress |
| e. | Click Save. |
6.Click Save.
About ADFS/SAML Diagnostics
You can only test the connection after you save the configuration. To run the ADFS/SAML diagnostics from somewhere other than this workspace, enter the URL directly. For example, if you provider name is "Local ADFS", enter https://tenant.com/handlers/sso/diagnostics/SsoProviderLog.aspx?ProviderName=Local+ADFS.
Ensure that your browser does not block pop-ups.
1.Click Test Authentication. The application displays any diagnostic messages.
Authentication Request Messages
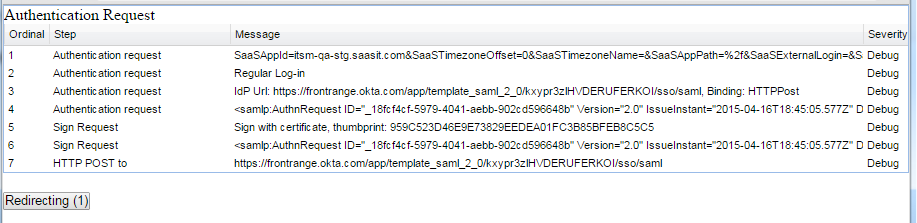
2.To see the authentication request log, click Redirecting to pause sending the request to the server. This cancels the immediate redirection and the browser is not redirected until you click Redirecting again. If you do not click Redirecting, the application redirects you to the identity provider URL and you do not see the messages until authentication succeeds.
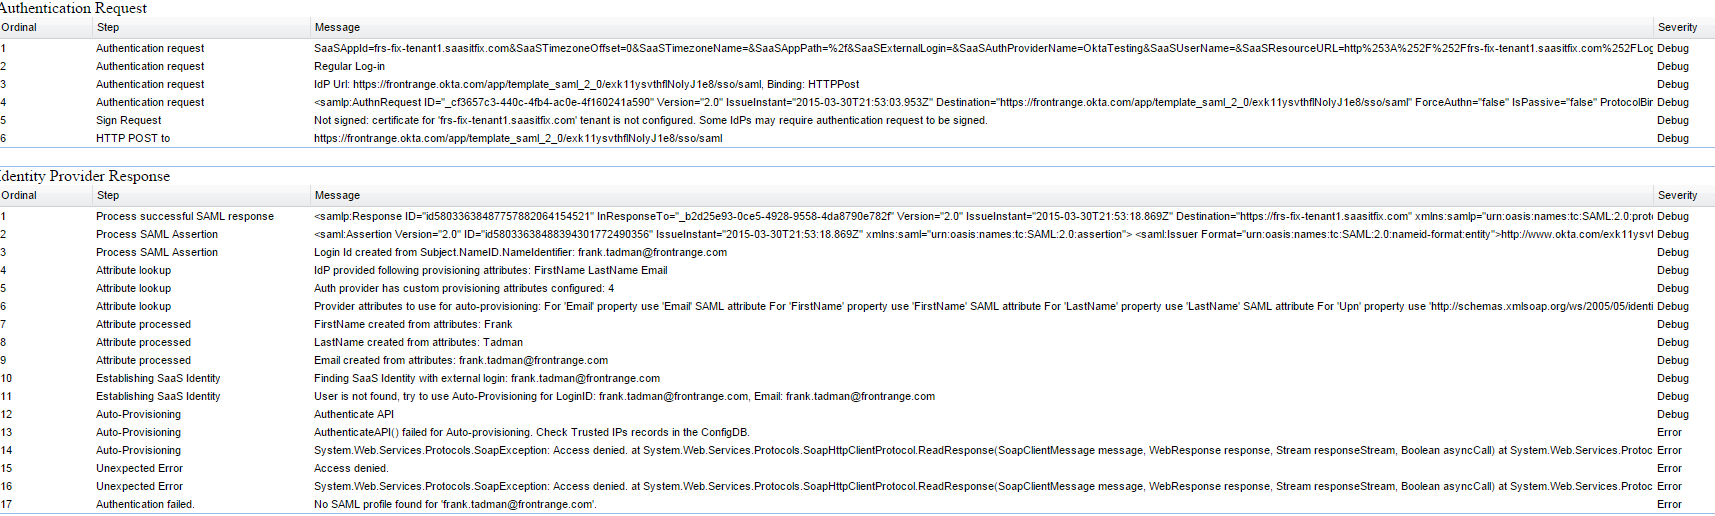
After logging into the identity provider, both the authentication request and response log messages are available.
Request and Response Messages
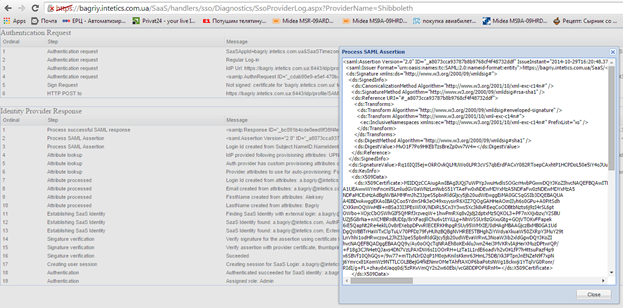
3.Click on a log line to display a preview window:
SAML Diagnostics Preview Window
About Provisioning Attributes
If you enable auto provisioning, the SAML attributes for login ID, first name, last name, and primary email must be in the identity provider response. This is because if you create a user record, you must fill in the required properties. These attributes can either have a default value (as shown in the table above) or can be customized by using the Provisioning Attributes tab. These values depend on your identity provider. Check with your identity provider administrator to make sure that they are not using different values.
The LoginID field does not have to be in the form user@domain, but it usually is. The value of the LoginID field cannot contain angle brackets.
Exporting Ivanti Neurons for ITSM Relying Party Metadata
You can use the information from the SAML endpoint to configure the Neurons for ITSM relying party. Neurons for ITSM exposes SAML endpoint configuration through a metadata endpoint, such as at https://system_URL/handlers/sso/Metadata/SamlRelyingPartyMetadata.ashx. You can use it directly or to produce an XML file with metadata.
You cannot use the metadata endpoint directly with ADFS due to certificate errors.
Adding an Authentication Provider by Importing Metadata
If a SAML identity provider exposes metadata through an endpoint or a separate file, you can create an authentication provider record from the supplied XML.
1.Open https://system_URL/handlers/sso/Metadata/SamlImportIdP.html. The application displays the Import SAML Metadata page.
Import SAML Metadata
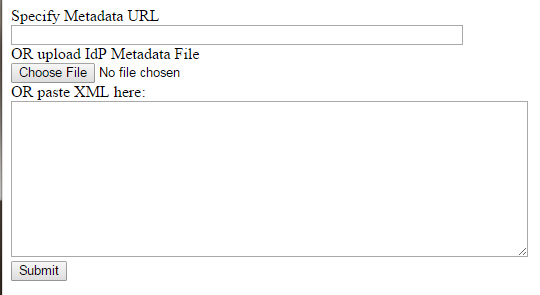
2.Enter information into the form. You can enter a URL, a file name, or XML. An example of the XML to supply is at https://wiki.shibboleth.net/confluence/display/SHIB2/MetadataExample.
3.Click Submit. The application creates an authentication provider record including a link.